
Route templates provide default routing settings to associate with a resource when it is created. Users can remove multiple route templates from the list by Shift or CTRL clicking the desired row and selecting Delete option from the right-click menu.
i Tip - Resource settings override settings taken from the Route template.
To access a Route template:
1 From the main menu, select: Data > Templates > Route.
The list of Route templates appears:
2 Right-click on a selected Route template record and select one of the management options: New, Edit, Create Resources, or Delete. It is also possible to double-click a specific Route template record to directly edit that record.
The selected Route template page appears:
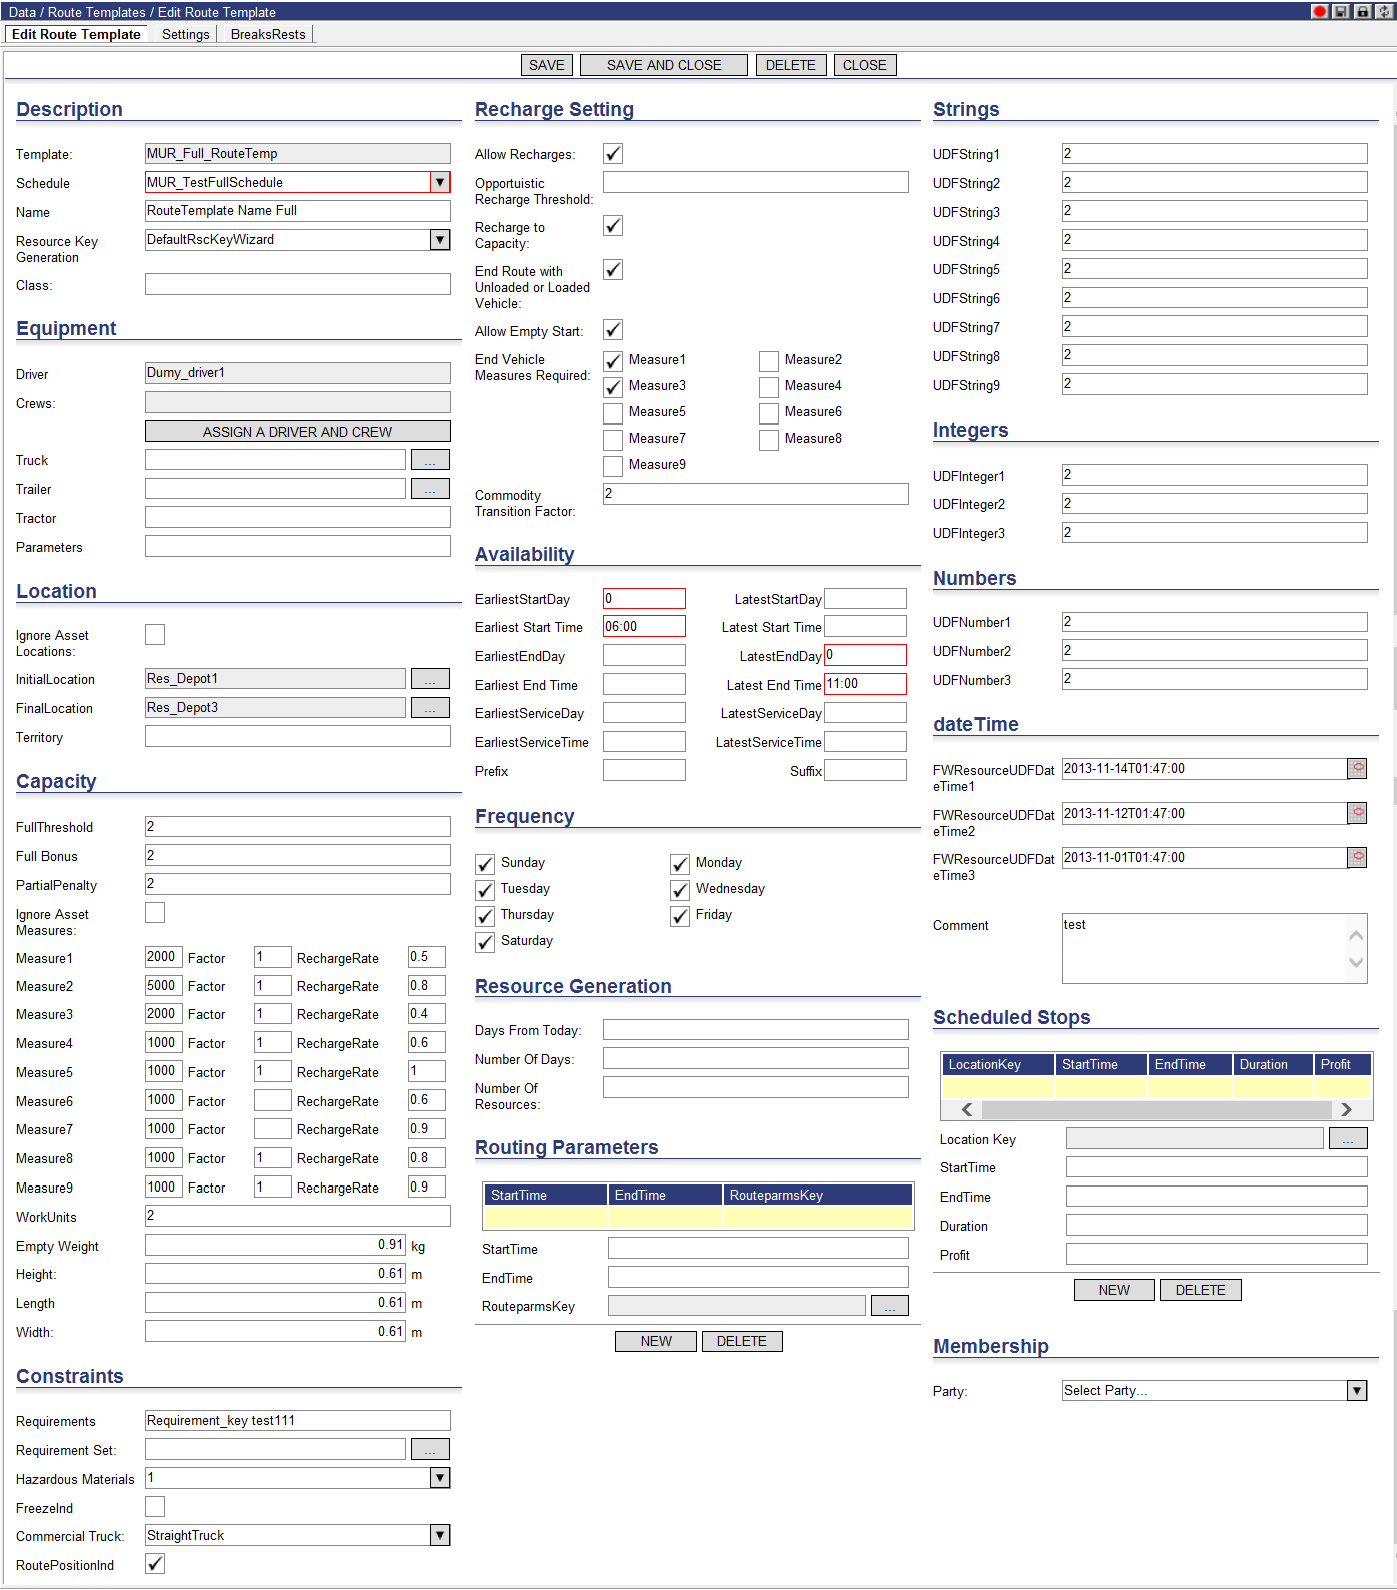
3 Enter data in the appropriate fields.
4 Click the Assign a Driver and Crew button to navigate to the Crew page to complete assignments.
5 When finished entering data, click Save.
To edit multiple route templates:
1 Select the desired resources from the Route Templates list page, right-click and select Edit Selected Templates.
The Edit Multiple Route Template page appears. It is blank so that the user can enter new values for the selected templates.
2 Enter or select the appropriate information in the appropriate fields.
3 Click Save to save the new information for the selected templates.
The new information is applied to the selected route templates. The new template(s) can now be used as the basis for adding new resources. The new template can now be used as the basis for adding new resources.
Route template windows can also be created to set specific time windows that define a resource’s availability. Route template settings are associated directly with the Route template and are used to validate resource availability.
To create New Resources from Route Templates:
1 From the list of Route Templates, right-click a Route Template and select: Create Resources.
The following screen appears:
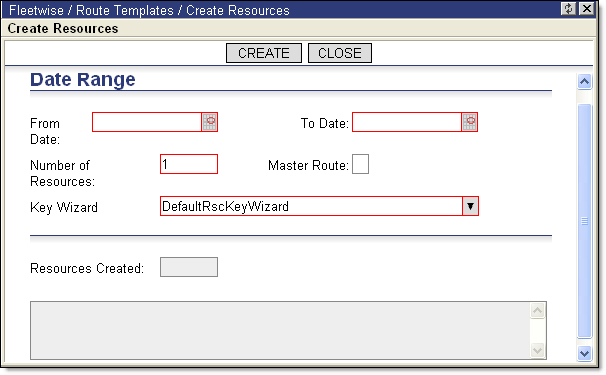
2 Enter the date range and the number of Resources to create for each day.
3 When finished entering data, click Create. This will create the total number of resources for the provided date range. When finished, the Note area will display the number of resources created.
4 Click Close to exit this window
The Earliest Hr Gen OpenWindow and Latest Hr Gen CloseWindow fields allow users to put a cap on how early a generated time window can open and how late a generated time window can close. If the generated time windows resulting from any of the following operations exceed the cap values set in the Earliest Hr Gen OpenWindow and Latest Hr Gen CloseWindow fields, the cap value is used instead.
• Lock Generated Time Windows operation
• Route moved to another schedule
• All routes moved to another schedule
• Status updated from first status call
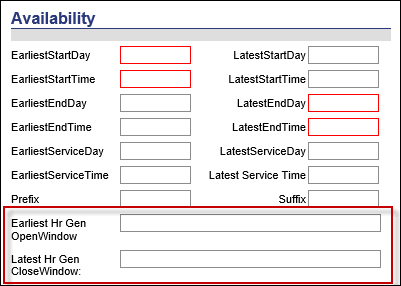
For example, if a user selects the Lock Generated Time Window option for a route in the Routes quadrant and the generated open time window is earlier than the cap value entered in the Earliest Hr Gen OpenWindow field, the cap value is used instead.
Please note the following the following exceptions regarding this feature:
• If the Projected Arrive Time is earlier than the Earliest Hr Gen OpenWindow value, the Projected Arrival Time is used instead.
• If the Projected Departure Time is later than the Latest Hr Gen CloseWindow value, the Projected Departure Time is used instead.
![]() Note - In these cases, users should
fix the route starting and ending times since the resource settings conflict
with the cap values provided.
Note - In these cases, users should
fix the route starting and ending times since the resource settings conflict
with the cap values provided.
• If no value is entered in these fields, no cap is enforced.
Users can create route templates by populating and importing a CSV template. To create route templates via import:
1 Navigate to Data > Templates > Routes.
2 Right-click on the page and select the Export the CSV Template option from the right-click menu. From the browser prompt, save the file to your machine.
3 Open the CSV in a spreadsheet application and enter the necessary data.
4 Right-click on the Route Templates list page and select the Import CSV Data right-click menu option. The Import Route Templates window appears.
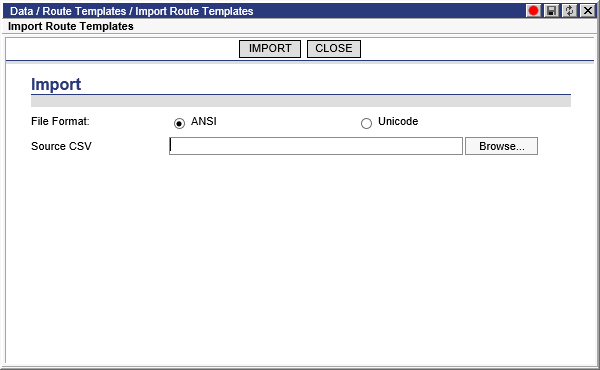
5 Select the File Format.
6 Click Browse to and select the CSV template using the dialog.
7 Click Import.
To assist with the creation of resources from route templates extemporaneously, select the Edit and Create Resources right-click option. With this option, users can review and edit the key parameters of a route template before creating resources from it.
1 From the Route Template list page, right-click on the desired route template and select the Edit and Create Resources right-click menu option. The Review Key Parameters Before Creating Resources page appears.

2 Select a Resource Key Wizard and an Order Key Wizard from the appropriate drop-down menus.
3 Specify a Driver, Truck and Trailer using the appropriate drop-down menus. Users can choose the Select Driver, Select Truck or Select Trailer options from the Driver, Truck and Trailer drop-down menus respectively to display a window with a list of the selected assets.

The list of assets can be filtered using the Find search box. To assign an asset to the resource, select one from the list, right-click and choose the Select This [Asset] option. For drivers, users can select multiple rows and apply this option. The drivers will be displayed in the associated Crew page.
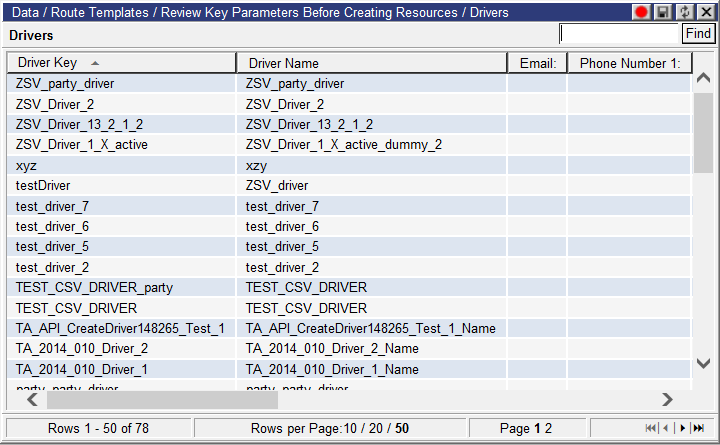
Click the Crew field to display the Crew page, for finer control of the driver assignment process.

4 Select relevant date information using the calendar controls and select a schedule from the Schedule drop-down menu.
![]() Note - The Resource
Key Wizard menu, Earliest Start and Latest End fields are required.
Note - The Resource
Key Wizard menu, Earliest Start and Latest End fields are required.
5 Click Create when finished. The system returns a success dialog in response. Click OK to return to the page.
The Settings tab is used to set up the following information for the Route template:
· service duration
· bonus or discount information
· any penalties to be applied to the route
· any limits to be applied to the route
· speed factors that may effect the route
· any working hour rules (i.e., driver/transportation rules)
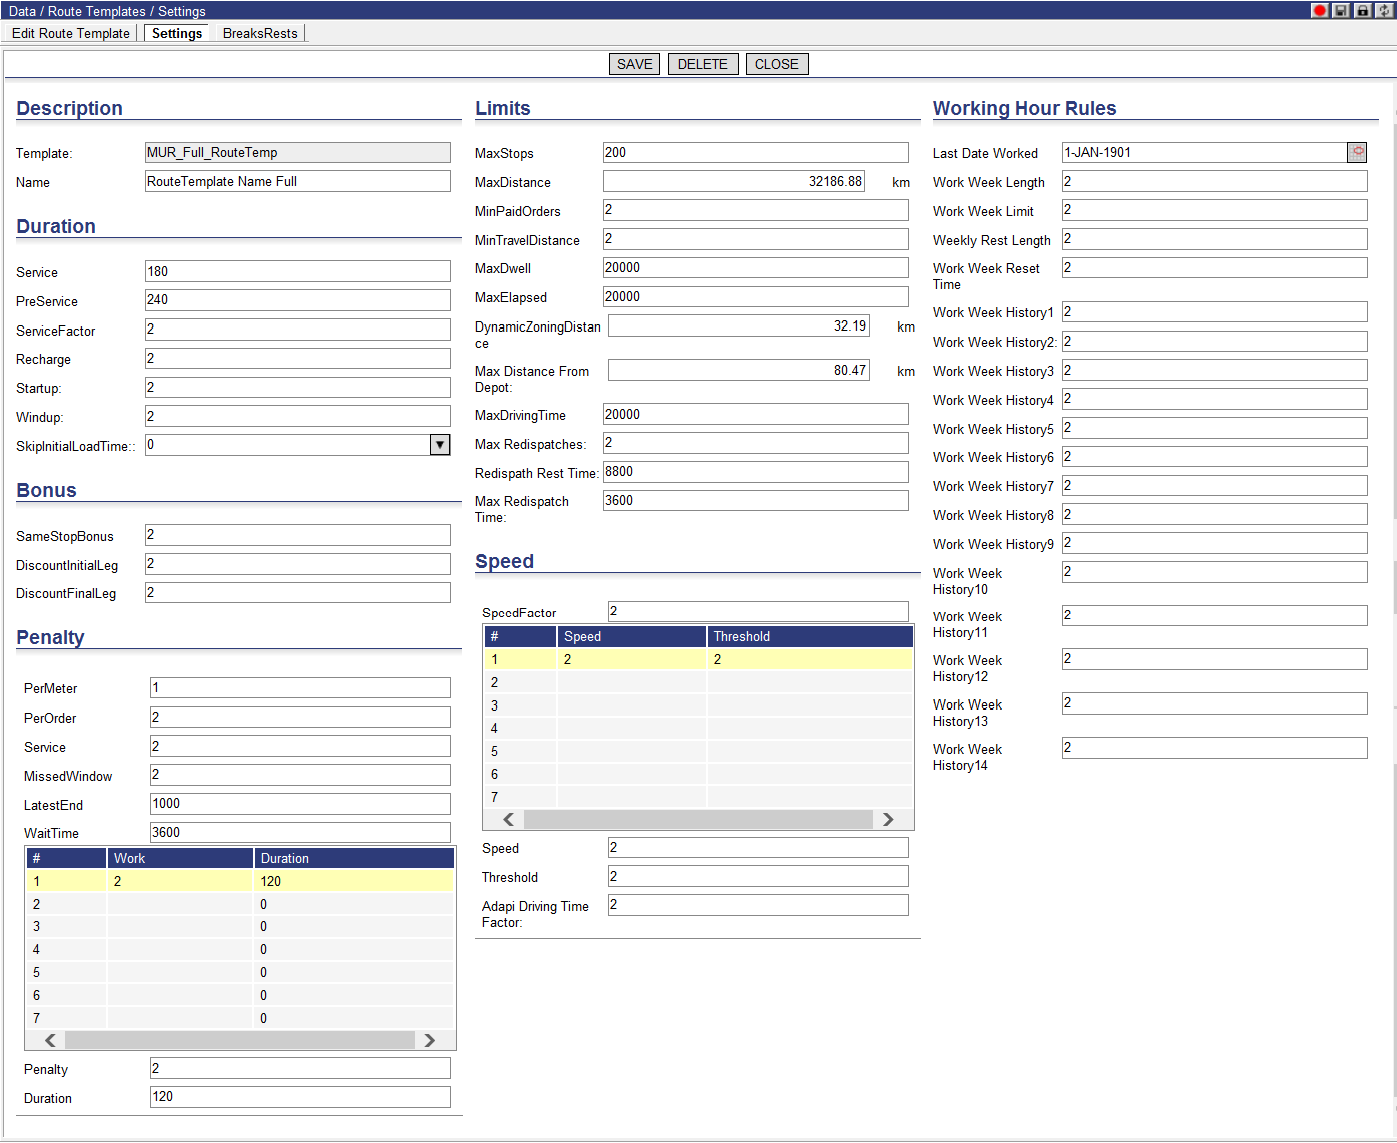
To set the route settings:
1 From the Route Templates list page, right-click the selected Route template and select Edit. The Edit Route Templates page appears.
2 Click Settings.
3 Enter data in the appropriate fields.
4 When finished entering data, click Save.
The BreaksRests tab is used to set up resources’ breaks and/or rests.
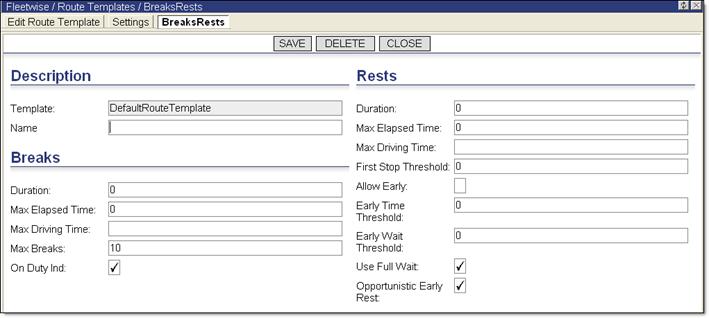
To set up breaks and/or rests:
1 From the Route Templates list page, right-click the selected Route template and select Edit. The Edit Route Templates page appears.
2 Click BreaksRests.
3 Enter data in the appropriate fields.
4 When finished entering data, click Save.
![]()